
There might not be a single day when you have not exchanged coins with someone. But, have you ever wondered how modern coins are minted? Let’s take a closer look at the coin minting process that is involved in striking the coins that you have with you, right now in your pockets!
Design:
The first and foremost step in the coin minting process is the design creation. An experienced artist draws a sketch on paper. This design may include the specifics and detailed elements of the final coin design, but not always. The design is then handed over to expert sculptors and engravers who convert the 2D design into a 3D design using plaster or other similar materials that are used for creating an artwork. The plaster model is generally 10” to 16” in size and is always in positive relief, just like how it appears on coins. The final plaster sculpture is coated with epoxy resin which acts as a hardener and a preservative. The end product is called “galvano”. Two such galvano models are created, one for the obverse of the coin and the other for a reverse.
Master Hub:
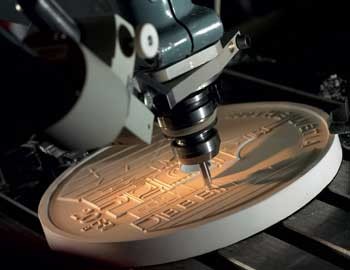
Creating the Master Hub is the next step in the coin minting process. The large galvano models are placed in a Transfer Reducing Machine on one side. The other side has a steel rod having a diameter of the coin that would be minted. The machine uses fulcrum principal to carve out the steel rod with the design, which is called as the reducing stage of die production. This steel piece goes through tempering or annealing process for hardening. The “Master Hub” has a similar relief as that of the galvano. Generally, a single Master Hub is made for the complete set of coins with the same design.
Master Die:
Hubbing is a coin minting process that is used to create a Master Die from a Master Hub which is placed in a Hydraulic hubbing press at one end. The other end has a steel rod with the same diameter as that of the coin. The two are pressed together under pressure and the master die gets the mirror image or negative impression of the Master Hub. This step is repeated many times to have the inscription of required depth. Annealing of the Master Die is required at the end of every strike to retain the strength of the Die. A single high-pressure strike is avoided as it could weaken the die which would later develop into cracks. 2 to 4 Master Dies created depending on the number of coins that need to be minted.
Working Hubs:
The only difference between the coin minting process involved in making the Working Hubs and Master Die is that one end of the hubbing press has Master Die for making the Working hubs. The Working Hubs will have a positive relief. Many such working hubs are created.
Working Dies:
Working Dies are used to strike the coins in the coin press. The only difference in the coin minting process of making the working Die and the Master Die is that one end of the hubbing press has the Working Hubs. Working Dies have a Mirror image and a Negative relief. In normal cases, a single working die can strike around 500,000 coins, after which they are replaced.
Mint marks and dates are added on the working dies using hand punches if more than one mint is issuing the coins. Errors like date doubling, double mint marks, and errors happen during this phase of the coin minting process. However, the mint marks and the dates are added to the Master Die if the number of coins to be minted is very high. The mint mark and date are also added to the plaster sculpture itself if the Mint is creating their own design.
Planchets:
The raw metal of the required composition is made into long sheets. The composition and exact specification of the metal is a secret between the Mint and the metal provider. The metal sheet is fed into a punching machine after a thorough quality check. Blanks of the desired shape are created by the punching machine during this coin minting process. The remaining metal or webbing is recycled.
Imperfect blanks are now separated by passing them over a mesh of the size of the coin. Larger coins will not fall, but coins of same or smaller diameter fall through. The next mesh has holes of a size slightly smaller than the coins. The smaller blanks fall through the mesh holes. These correct sized blanks then undergo annealing and cleaning process after which they are put into the upsetting machine. This machine creates the raised edges around the blank. Raised edges help the metal flow into the die design rather than flow off. They also allow the coins to be stacked properly. The blanks are then fed into a furnace and given a chemical bath to give them a distinctive colour or tone based on the metal used. The final Blanks are called Planchets that are ready to be stuck.
Striking:
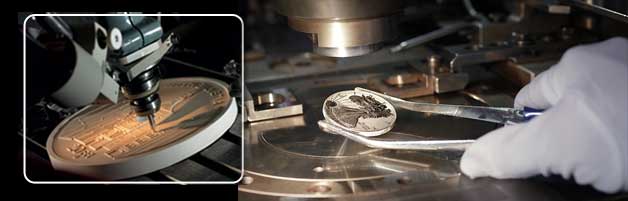
The striking chamber has 2 working dies. The reverse working die is placed in the “Anvil die”. The “Hammer die” has the Obverse working die. The coins are fed through a funnel into the striking chamber during this coin minting process. The bottom of the funnel has feeder tubes with 2 feeder fingers. These place the planchet on the anvil and eject the stuck coins. A collar [metal ring] holds the coin and the hammer strikes the planchet with the desired force. The collar prevents the planchet to expand beyond the desired diameter of the coin. Some collars have reeds so that the planchets that are struck have a reeded edge. After the strike, the hammer moves back and the feeding fingers then slide this coin out of the striking chamber. The process repeats several times to mint coins.
Almost 120 coins can be struck per minute using modern technology. To increase the speed, multiple planchets are struck at the same time. The coins then go through a quality check process. Whenever a new die is introduced, the coins are manually inspected for errors.
Counting:
The coins are then sent to the counting and bagging area using a conveyor where they are counted mechanically and bagged. The bagged coins are also weighed to ensure that they are of the right weight. The bagged coins are put into gunny bags which are signed by the official of the mint during this coin minting process. The ready coins are then sent to the central bank which distributes them to the general public.
Proof Coins:
Extremely high grade die blanks are used to create dies for Proof coins. The dies are chosen from many working dies and are hand-polished achieve a mirror finish. Sometimes, 3-4 rounds of polishing with different diamond paste achieve high-mirror finish. Today mints also look for Frost finish where the entire die is covered with soft tape and just the key design is exposed and sand blasted. The background gives a mirror finish and the design gives a frost finish. The blanks used for striking proof are polished. The proof coins are hand struck sometimes more than 3-4 times so as to give a sharp edge to the design. New dies is used to reduce the wear on the coins. The dies are cleaned after 20 to 30 strikes. Minor imperfections are checked at regular intervals and are removed by polishing the die again. Each coin is manually inspected before packaging and shipping. The rate of coin production for proof is less than 500 per day.
Please note that this is how modern coins are minted using the power of technology. Ancient and medieval coins were struck using manual processes.
Many-a-times, we do not tend to value coins that much, now that you know how they are made, you would feel special when you pick a coin in your hand every time!
Visit www.mintageworld.com to immerse yourselves into the world of coins.
The Mintage World Team comprises of experts, researchers and writers from the field of Philately, Notaphily and Numismatics who try to shed light on some of the most interesting aspects of coins, banknotes and stamps from not just India but across the globe as well.

As Charlie Sheen says, this article is “WINGINN!”